
Crazy AI Transitions for Adobe Premiere
This plugin generates a spectacular AI transition between two clips on your timeline, then brings the result back into your project. This page explains how to get good results.
Manual
Read the manual below for instructions how to use the plugin, or consult the Frequently Asked Questions.
FAQWhat you need
- A PC with Windows or an Apple with MacOS.
- Adobe Premiere Pro, version 26 or higher.
- The Crazy AI Transitions plugin installed (from Creative Cloud Marketplace) and opened from Window → UXP Plugins.
- An internet connection while generating.
Quick start
-
Sign in with Google and a webbrowser will open, asking you to log-in. You get 3 free credits after signing in.

-
In the timeline, select two consecutive video clips on the same track (use Shift on the keyboard when clicking the second clip). Clips must be on the same track (e.g. not a clip on V1 and another on V2).

Correct selection of two consecutive clips
- In the plugin, choose a Motion preset from the dropdown.
- Click Start. The plugin shows the detected clip names, exports frames, sends them to the AI service, and starts generation of the transition video. This may take up to 3 minutes, depending on server load, so please be patient.
- Use Stop if you need to cancel a run in progress. If you stop before video generation on the server has started, your credits won´t be charged.
Account & credits
When you link your Google account, the plugin can show your email and remaining credits. Log-Out and Sign-In again to refresh your credits after purchase. Each full transition generation uses one credit (charged when the video generation starts).
If you run out of credits, the order page in your browser will open, allowing you to purchase more: makayama.com/crazytransitions.html
You can Log Out at any time to sign out from your account; sign in again when needed.
When you have trouble purchasing credits or any other question relating to the plugin Contact Us at any time to get support.
Motion presets
Motion presets are curated styles in three categories (camera movements, realistic effects, surreal effects). Every transition is custom calculated by the AI, based on the start and end frames. The following transitions are available:
Camera Effects
- ⚡ Zip-Zoom: A fast zoom rushes through the first scene and lands in the second with matched motion.
- 🪐 Orbit: The camera circles the subject as the first scene transforms into the second.
- ➡️ Pan Right: The camera pans right while the first scene smoothly changes into the second.
- ⬅️ Pan Left: The camera pans left while the first scene smoothly changes into the second.
- ⬆️ Tilt Up: The camera tilts up as the first scene transitions into the second.
- ⬇️ Tilt Down: The camera tilts down as the first scene transitions into the second.
- 🔍 Dolly In: The camera pushes forward into the subject as the scene morphs into the next shot.
- 🎬 Dolly Out: The camera pulls back from the subject while the first scene transforms into the second.
- 🚁 Drone Flyover: A drone-style forward flyover rises gently and reveals the next scene.
Realistic Effects
- ✨ Flashy: A bright flash morphs the first scene into the second.
- 💥 Explosion: A cinematic explosion covers the frame and reveals the next scene.
- 🐾 Animal Walk-By: An animal crosses the foreground and wipes into the next scene.
- 🌊 Waterfall Pour: A heavy water pour fills the frame and clears to reveal the next shot.
- 🟤 Mud Splash Morph: A burst of mud covers the frame and transitions into the next scene.
- ⛈️ Storm: Wind and rain sweep across the frame to morph into the next scene.
- ❄️ Snowfall: Dense snowfall builds up and blends the first scene into the second.
- 🪨 Falling Debris: Falling debris obscures the first scene and reveals the next one.
- 🚗 Cars Passing: Passing cars create motion wipes that transition into the next scene.
Surreal Effects
- 🌀 Morphing: The main subject morphs from the first scene into the second.
- 🎨 Colorful Paint Splash: Vivid paint splashes across the frame and reveals the next scene.
- 🏓 Ping Pong Ball Burst: A burst of ping pong balls fills the frame and transitions to the next shot.
- 👹 Monster Transformation: The subject briefly mutates into a monster before resolving into the next scene.
- 🤪 Go Crazy: Chaotic spins, zooms, and warps slam the first scene into the second.
- 🚀 Sci-Fi Spaceship Pass: A fast spaceship flyby wipes the frame into the next scene.
Manual Prompt
Manual Prompt lets you type your own description. Be specific about camera motion and what should stay consistent between the two frames. The plugin still uses the same two exported frames as anchors. A few examples of custom prompts that you could use:
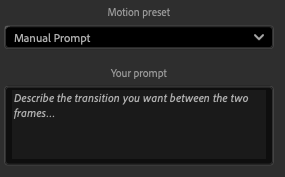
- Bicycle: The main character in the first frame quickly hops on a bicycle, rides towards the camera, filling the frame until the background is no longer visible and then exits the frame, revealing the second frame. Natural motion continuity and realistic lighting.
- Floating: Keep the same main character and visual style; the character starts levitating and floats directly toward the camera until they fill the frame completely, then drifts out of view to reveal the second frame with a seamless cinematic transition.
Portrait & landscape
Output aspect ratio follows your edit orientation: if your timeline is landscape, 16:9 aspect ratio, the AI will generate a landscape transition. With portrait timelines (for example social media) the transitions generate a 9:16 video. Your sequence settings should match how you intend to deliver the video.
If results look wrong: Check Sequence → Sequence Settings and confirm the frame size matches your delivery format. Mixed-orientation media on a mismatched sequence can confuse both the export and the AI.
While the plugin is working
- Status shows the current phase (export, upload, wait for render, save).
- Extracted frames shows the actual start and end images sent to the service—use this to verify framing before or after a run.
- If something fails, an error area appears; use Copy to paste the message when contacting support.
After a successful run
When generation completes, you will be prompted to save the video to a preferred location on your internal or external disk. The transition video is added to your project and placed on the timeline, between the two selected clips. If a save or insert step fails, the error text usually names the cause (permissions, disk space, or other message).
Troubleshooting
“Could not find two consecutive clips”
Select exactly two adjacent clips on the same video track, in order. Nested sequences and complex track layouts may require simplifying the selection.
Colors of the transition don't match with the original clips
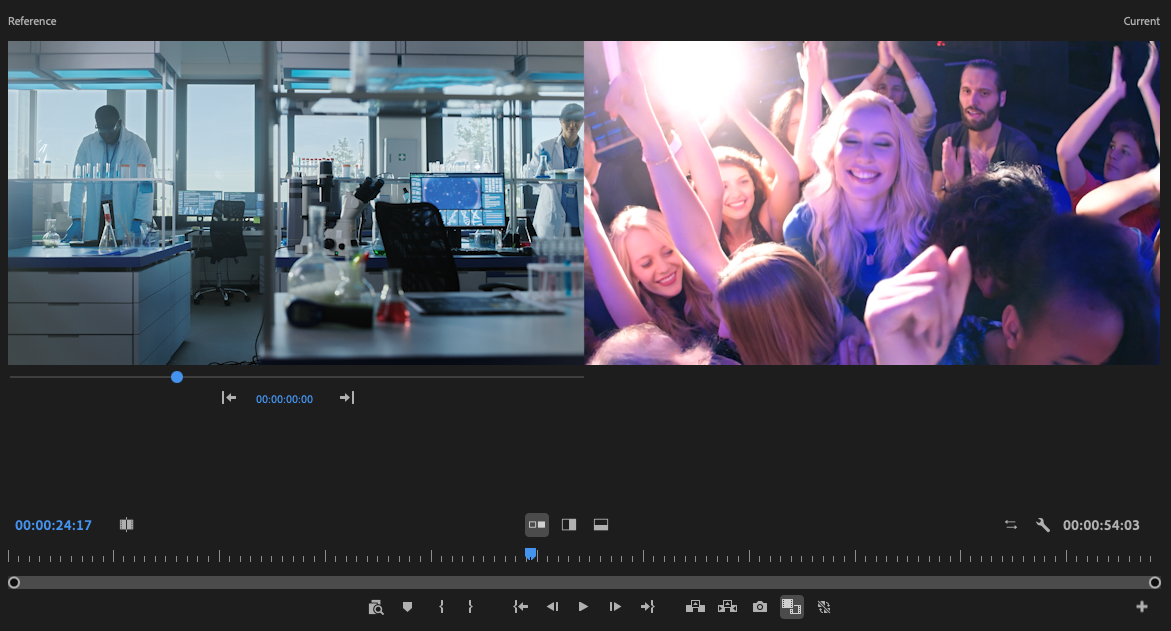
If you are using LOG footage, apply a basic color correction before creating the transition. Still, the AI-generated video transition may have slightly different colors. To solve this, select the Window / Lumetri Color menu. Go to Color Wheels & Match. Select the first frame of the video transition on the timeline. Then click Comparison View. You see a split screen. Move the reference slider (the one beneath the two clips) untill you see the first clip. You now have the Reference and Current frame selected. Press Apply Match in the Color Panel on the right. The two will be color matched. You may have to manually adjust the exposure and contrast a bit in the Basic Correction section of Lumetri.
Video Output is too low quality
The video output generated by the AI is always a 1080p MP4 file with H264 compression. This may result in compression artifacts (low visual quality) when there are strong movements or lots of color changes. At this stage it's NOT possible to output ProRes or any other professional grade codec. Also, it's NOT possible to change the bitrate or resolution. This may change in future updates of the plugin.
HTTP or AI errors
Confirm you are signed in if credits are required, that your network allows HTTPS to Makayama and the video provider, and try again after a minute. Persistent 400 errors often mean invalid input (for example corrupted frame export); try a shorter test clip or a different preset.
Hang on “Exporting” or “Sending”
Very large sequences or slow disks can delay frame export. Stop and retry, or reduce sequence resolution temporarily to test.
Privacy and House Rules
To generate a transition, the plugin must send your two still frames and -optionally- your manual prompt text to the AI video service operated by Makayama. Do NOT use prohibited footage, such as:
- NSFW Content: Explicit sexual material, pornography, erotic content, and graphic sexual acts are strictly banned.
- Violence and Gore: Images depicting graphic, shocking, or excessive violence, including injuries or cruelty to animals.
- Harmful/Illegal Content: Content promoting dangerous, illegal, or hateful activities.
- Minor-Related Content: Any content involving minors that violates strict zero-tolerance child safety policies.
- Copyrighted Characters and Brands: Images of famous characters (for example Marvel, Disney, or DC) or company logos.
- Public Figures and Realism: Images or edits of specific real-world people (celebrities, politicians) without authorization.
- Deepfakes and Deception: Content designed to mislead, such as altered photos intended to spread misinformation, especially involving political or historical events.
- Restricted Anatomy/Fashion: Lingerie or underwear content, and in some cases realistic human figures, may be flagged as inappropriate skin or body parts content.
- Unauthorized Editing: Uploaded photos with unique identifying features (for example specific faces or tattoos) used for face or outfit swapping are restricted to protect privacy.
- Watermark Removal: Requests that aim to remove AI watermarks.
Violation of these terms may result in a ban. The AI may refuse to process your request and throw an error. Refunds are NOT available for credits attempting to generate forbidden content.
Need Help?
If you have trouble with the plugin, account, or credits, our support team is ready to help. Open Support Form